
Table of Contents
ToggleHardwiring outdoor security cameras means drilling through siding, fishing cables through walls, and sometimes hiring an electrician to add a weatherproof outlet. Solar-powered wireless cameras skip all that. They mount anywhere with decent sun exposure, store footage locally or in the cloud, and recharge themselves daily. For most homeowners, they’re the fastest path from empty eaves to 24/7 monitoring, no permits, no fishing wires through attic insulation, and no surprises on the power bill. This guide breaks down what separates the best solar security cameras from the bargain-bin models that die every cloudy week, walks through the features that actually matter, and gives you a realistic installation plan that won’t require a ladder buddy or a Saturday you don’t have.
Key Takeaways
- Solar-powered wireless security camera systems eliminate costly hardwiring, trenching, and electrician fees while enabling flexible placement anywhere with adequate sun exposure, making installation possible in 30 minutes per camera.
- A robust solar security camera setup requires at least 10,000 mAh battery capacity, 3–5 watt solar panels, 2K resolution with HDR/WDR, and color night vision for reliable year-round operation across variable climates.
- The Reolink Argus 3 Pro and Eufy SoloCam S340 Solar deliver the best combination of performance, features, and value for most homeowners, while Ring and Arlo options work best for those already invested in their ecosystems.
- Proper installation requires pre-drilling with appropriate bits for your surface (wood, brick, vinyl), mounting 8–10 feet high, angling panels to face true south at 30–45°, and confirming strong Wi-Fi signal before drilling.
- Solar cameras continue operating during power outages when grid-dependent hardwired systems fail, and in cold or cloudy regions, occasional manual top-offs or USB power banks ensure uninterrupted monitoring through winter months.
- Monitor battery drain daily for the first week and adjust motion sensitivity or recording length if levels drop more than 10% per day, indicating the solar panel isn’t generating sufficient charge for your activity level.
Why Choose Solar-Powered Wireless Security Cameras for Your Home
No electrical run. That’s the single biggest installation advantage. You’re not cutting into stucco, running conduit down a brick wall, or paying an electrician $150/hour to add a GFCI outlet under the soffit. Mount the camera, aim it, connect it to Wi-Fi, and you’re done. Most installs take under 30 minutes per camera.
Placement flexibility. Hardwired cameras cluster near outlets or junction boxes. Solar units go wherever you have decent sun, the back fence, a detached garage, a gate post 200 feet from the house. If your driveway or side yard gets four to six hours of direct sunlight daily, you have a viable camera location.
No ongoing power cost. A wired camera pulling 5 watts 24/7 adds roughly $5–7/year to your electric bill per camera. Four cameras, ten years, that’s $200–280. Solar units cost zero after install. In regions with tiered utility rates or time-of-use billing, the savings tilt further.
Operational during power outages. When the grid drops, wired cameras go dark unless you have a UPS or whole-home battery backup. Solar cameras with integrated batteries keep recording. If someone targets your house during a storm outage, you’ll still have footage.
DIY-friendly for renters and temporary setups. Drilling into a rental’s exterior usually violates the lease. Solar cameras mount with brackets that use four to six screws, easy to patch and paint when you move. They’re also ideal for construction trailers, seasonal cabins, or jobsite monitoring where trenching power isn’t worth the cost.
Top Features to Look for in Solar-Powered Security Cameras
Not all solar cams are built the same. Budget models often pair a 2-watt panel with a 5,000 mAh battery and call it a day, fine for Phoenix, useless in Seattle winter. Here’s what separates the best solar powered security camera systems from the ones that need a boost charge every month.
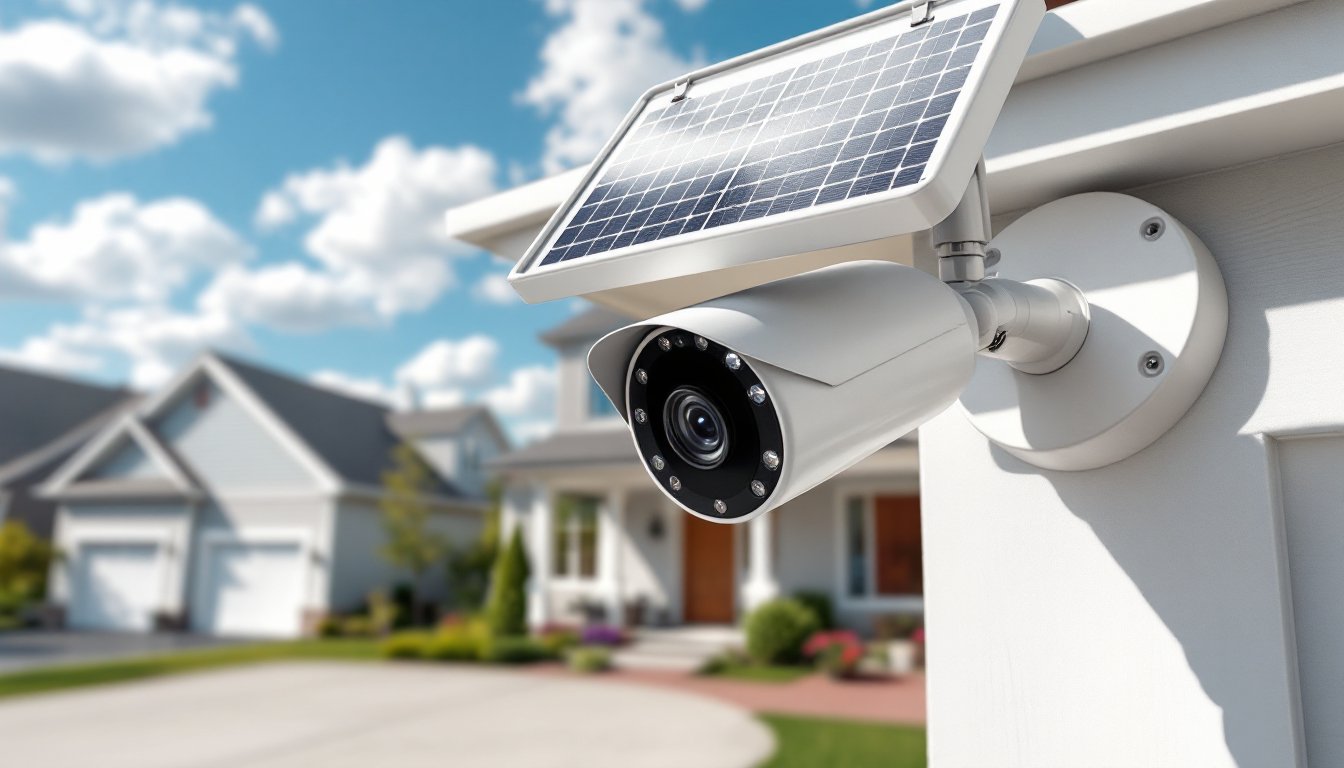
Video Quality and Night Vision Capabilities
Resolution: 1080p (1920×1080) is the floor in 2026. It’s sharp enough to ID a face at 15–20 feet or read a license plate at 10 feet in good light. 2K (2560×1440) and 4K (3840×2160) options exist, but they chew through storage and bandwidth fast. For most residential driveways and porches, 2K hits the sweet spot, better zoom detail without filling your microSD card in three days.
Field of view (FOV): 110–130° covers a standard two-car driveway or front porch. Wider (160°+) introduces barrel distortion at the edges and can miss detail in the center. Narrower (90°) works for tight side gates or focused entry monitoring. Match the FOV to the space: ultra-wide isn’t always better.
Night vision: Most cameras use infrared (IR) LEDs that illuminate up to 25–35 feet in complete darkness. The image is black-and-white, which is fine for motion detection and identification. Color night vision (often marketed as “spotlight” or “starlight”) uses a low-lux sensor plus a small LED floodlight. It delivers full-color footage but drains the battery faster and can annoy neighbors if the light triggers constantly. Performance reviews on platforms like CNET often highlight real-world night vision range, which tends to fall short of manufacturer claims by 20–30%.
HDR and WDR (wide dynamic range): If your camera faces east or west, morning or evening sun will blow out the image without HDR. WDR balances bright skies and shadowed porches in the same frame. It’s not a luxury feature, it’s essential for usable daytime footage.
Battery Capacity and Solar Panel Efficiency
Battery size: Look for at least 10,000 mAh in regions with variable weather. Smaller batteries (5,000–6,000 mAh) work in consistently sunny climates but won’t survive a week of Pacific Northwest drizzle. Larger packs (13,000–20,000 mAh) provide a buffer for winter or extended cloudy stretches.
Solar panel wattage: 3–5 watts is typical. Anything under 2.5 watts struggles to keep up with continuous recording or frequent motion events. Panels rated at 5+ watts can top off the battery even on partly cloudy days, as long as they get a few hours of direct or bright indirect sun.
Charge time and consumption: A well-designed system pulls 1–3 watts during idle monitoring and spikes to 5–8 watts during recording and upload. A 5-watt panel in full sun generates roughly 20–25 watt-hours per day (accounting for inefficiency and angle). That’s enough to sustain moderate activity, 10–15 motion events, each triggering 30–60 seconds of recording. If your camera sees 50+ events daily (busy street, twitchy motion detection), even a good solar setup will slowly drain unless you dial down sensitivity or recording length.
Removable vs. built-in battery: Removable batteries let you swap in a spare or bring the pack indoors for a winter charge. Built-in designs are cleaner but leave you stuck if the battery degrades after two years. Most lithium-ion cells in these cameras last 500–800 charge cycles before capacity drops noticeably.
Best Solar-Powered Outdoor Security Camera Systems in 2026
Here are the standout systems, each suited to different install scenarios and budgets. Prices reflect typical street pricing as of early 2026: sales and bundles can drop costs by 15–25%.
Eufy 4G LTE Cam S330 (SoloCam S340 Solar): Around $200–230 with solar panel. 2K resolution, 360° pan-tilt, built-in spotlight, dual cameras (wide and telephoto). The telephoto lens is rare at this price, lets you zoom without pixelation. Battery is 13,000 mAh: the 3-watt panel keeps it charged in most climates. Long-term testing over seven months shows reliable performance even in variable weather, with occasional top-offs needed only during deep winter in northern latitudes. No subscription required for local storage (up to 128 GB microSD). Optional cloud plan runs $3–10/month. Good for homeowners who want pan-tilt control and don’t want monthly fees.
Reolink Argus 3 Pro + Solar Panel: $130–160 bundled. 2K resolution, color night vision, 5,200 mAh battery, 6-watt solar panel. The panel’s higher output compensates for the smaller battery. Supports 2.4/5 GHz Wi-Fi, which helps in crowded neighborhoods. Person/vehicle AI detection cuts false alerts from branches and cats. Local storage via microSD: cloud is optional. Lacks pan-tilt, so careful aiming during install is critical. Best for single-point monitoring (driveway, front door) where you won’t need to adjust the view later.
Arlo Pro 4 Spotlight (with Arlo Solar Panel Charger): Camera ~$180, solar panel sold separately ~$60. Total $240. 2K HDR, integrated spotlight, color night vision, rechargeable battery. Arlo’s ecosystem is polished, app is intuitive, smart notifications work well, and integration with Alexa/Google/HomeKit is seamless. The downside: Arlo Secure plan ($5/month per camera or $13/month for unlimited cameras) is effectively required for useful features like activity zones, cloud recording beyond 30 days, and advanced AI detection. Without it, you get live view and local recording only. Good for homeowners already invested in Arlo or who value tight smart-home integration and don’t mind the subscription.
Ring Stick Up Cam Solar: Camera ~$100, solar panel ~$50. Total $150. 1080p, basic motion detection, rechargeable battery pack. The most budget-friendly option here, but you’re locked into Ring Protect ($4/month per camera or $10/month for unlimited) for cloud recording and person alerts. Without the sub, it’s a live-view-only doorbell. The solar panel works but barely keeps up if motion events exceed 20/day. Best outdoor wireless security camera system solar powered for someone already using Ring doorbells/alarm and wanting to expand coverage cheaply.
Soliom S600: ~$170 with panel. 3MP (2304×1296), 9,000 mAh battery, built-in siren, full-color night vision via six white LEDs. Niche pick for areas where you want a visible deterrent, the siren hits 110 dB. Supports both Wi-Fi and wired Ethernet (via optional adapter), useful for detached structures with network drops but no power. No subscription: local SD card storage. Reviews on sites like Digital Trends note the motion sensitivity can be twitchy out of the box, expect to spend 10 minutes in the app dialing it in.
Selection tip: If you need pan-tilt or telephoto zoom, Eufy S340 is the best solar security camera choice. For stationary, no-subscription simplicity, Reolink Argus 3 Pro offers the best value. If you’re already in the Arlo or Ring ecosystem and the subscription doesn’t bother you, stick with those for easier integration.
Installation Tips for DIY Solar Security Camera Setup
Pick the location first, test the Wi-Fi second. Walk the perimeter with your phone and confirm you have at least two bars of signal where you plan to mount. Most cameras max out around 100–150 feet from the router through exterior walls: brick, stucco, and metal siding kill range faster than wood or vinyl. If signal is weak, add a Wi-Fi extender or mesh node before you drill anything.
Solar panel orientation matters. In the Northern Hemisphere, panels should face true south and tilt 30–45° for year-round efficiency. Most bundled panels mount directly to the camera or on an adjustable bracket. If the camera location is shaded, run the included 10–13-foot cable to mount the panel separately on a sunny fence post or eave. Check for shade creep, tree shadows shift with the seasons.
Mounting surface prep. Cameras typically come with masonry anchors and wood screws. For wood siding or trim: Pre-drill pilot holes slightly smaller than the screw diameter (usually #8 or #10 screws, so a 1/8″ or 5/32″ bit). For vinyl siding: Drill through into the sheathing or stud behind: don’t rely on the siding alone. For brick or stucco: Use the included plastic anchors and a 5/16″ masonry bit. Drill, insert anchor, tap flush, then drive the screw. Fiber cement (Hardie board): Use stainless steel screws and pre-drill with a carbide bit to avoid cracking.
Height and angle. Mount cameras 8–10 feet high, low enough to ID faces, high enough to deter casual tampering. Tilt down 15–20° to capture faces rather than the tops of heads. If vandalism is a concern, add a protective cage or mount inside a second-story soffit.
Weatherproofing connections. The solar panel cable usually has a weatherproof connector, but verify it clicks or screws tight. If the junction is exposed, wrap it with self-fusing silicone tape (not electrical tape, which degrades in UV). Don’t let the cable droop, it collects water and ice. Use cable clips every 12–18 inches to secure it along the wall or trim.
Initial charge. Most cameras ship 30–50% charged. Before mounting, plug the camera into USB power indoors and charge to 100%. Update firmware via the app, most vendors push critical stability and detection improvements in the first few months post-launch. Then mount, connect to Wi-Fi, and let the solar panel take over.
Adjustment period. Give the system a week. Check battery level daily in the app. If it drops more than 10% per day, either motion sensitivity is too high, the panel isn’t getting enough sun, or your activity level exceeds the system’s design. Dial down sensitivity, shorten recording clips (60 seconds to 30), or add a second panel if the camera supports dual input.
Winter and cloudy-season prep. In regions with extended overcast periods (Pacific Northwest, upper Midwest November–February), plan to bring the camera inside for a top-off charge every 4–6 weeks, or add a small USB power bank (10,000+ mAh) as a temporary booster. Some users leave a 20-foot USB extension tucked inside the soffit so they can plug in without unmounting.
Safety: Use a fiberglass ladder on level ground. Don’t lean a metal ladder against live electrical service lines. Wear safety glasses when drilling overhead, brick dust and wood chips will find your eyes. If you’re mounting above the second story or on a steep roof pitch, hire it out. A $100 handyman visit beats a hospital bill.
Conclusion
Solar-powered wireless cameras cut install time and wiring costs without sacrificing coverage. Match battery capacity and panel wattage to your climate, prioritize 2K resolution and solid night vision, and don’t skip the Wi-Fi range test before you drill. Most DIYers can have a two- or four-camera perimeter system up and recording in an afternoon, no electrician required.