Table of Contents
ToggleIf you’ve ever looked under your kitchen sink, you might’ve noticed your dishwasher drain hose arching up toward the countertop before heading down to the disposal or drain. That’s no accident, it’s called a high loop, and it’s one of the simplest yet most important plumbing details in your kitchen. This small configuration prevents dirty water from flowing backward into your clean dishes, which is exactly as gross as it sounds. Whether you’re installing a new dishwasher, troubleshooting drainage issues, or just trying to wrap your head around what your inspector flagged, understanding the dishwasher high loop is essential for keeping your kitchen safe and code-compliant.
Key Takeaways
- A dishwasher high loop is an upside-down U-shaped drain hose configuration secured under the counter that prevents contaminated wastewater from flowing backward into your clean dishes.
- The high loop works by using gravity to create a physical barrier above the sink or disposal level, protecting your dishes and health from backflow contamination caused by pressure changes or disposal use.
- Most building codes require either a high loop or an air gap for dishwasher drainage; the high loop is the more affordable and common choice because it’s cheaper, easier to install, and doesn’t require drilling into your sink.
- Installing a dishwasher high loop is a straightforward DIY project that typically takes less than 15 minutes and requires only basic hand tools, a bracket or screw, and a zip tie or hose clamp.
- When connecting a dishwasher to a garbage disposal, always knock out the disposal’s inlet plug first and secure the hose above the trap to prevent water backup and ensure the high loop works effectively.
- A properly installed high loop reduces standing water in the hose, which prevents odors, clogs, and mold growth while keeping your cabinet dry and code-compliant.
What Is a Dishwasher High Loop?
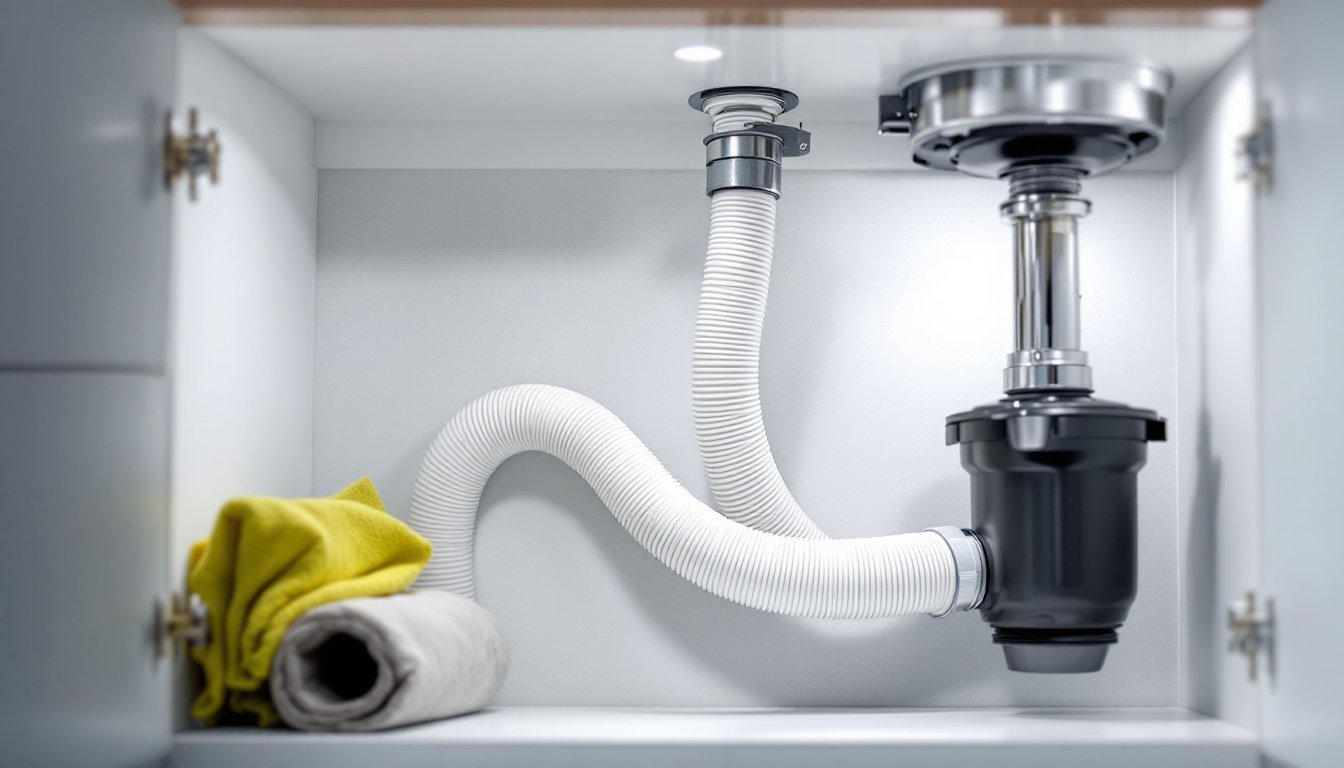
A dishwasher high loop is a configuration where the drain hose from the dishwasher is routed upward, typically secured to the underside of the countertop, before it descends to connect to the garbage disposal or drain line. The purpose is simple: gravity. By forcing the hose to rise above the level of the dishwasher’s drain connection and the disposal inlet, the high loop creates a physical barrier that prevents wastewater from siphoning back into the dishwasher.
The loop itself doesn’t require any special fittings or hardware. It’s just the drain hose shaped into an upside-down U and fastened at its highest point with a bracket, zip tie, or screw. Most dishwasher installation manuals specify a minimum height for the loop, usually 20 to 30 inches above the floor or as high as possible under the counter.
Some newer dishwashers come with integrated backflow prevention devices built into the unit, but even then, many jurisdictions still require a visible high loop or air gap. It’s a belt-and-suspenders approach to drainage safety.
Why Your Dishwasher Needs a High Loop
The primary reason for installing a high loop dishwasher drain is to protect your dishes, and your health, from contamination. Without this simple loop, wastewater from your sink or garbage disposal can flow backward into the dishwasher during certain conditions, like when the sink drains or the disposal runs. That means food particles, grease, and bacteria could end up pooling in the bottom of your dishwasher, where your supposedly clean plates sit.
Another reason: it helps the dishwasher drain more efficiently. A properly installed dishwasher drain hose high loop reduces the risk of standing water in the hose, which can lead to odors, clogs, and even mold growth over time.
Finally, it’s often required by code. Most building inspectors look for either a high loop or an air gap, a standalone device mounted on the countertop or sink. The high loop is the more common choice because it’s cheaper, easier to install, and doesn’t require drilling a hole in your sink deck.
Preventing Backflow and Contamination
Backflow happens when pressure differences cause water to reverse direction. For example, if your home’s water pressure drops suddenly, say, from a broken main or heavy irrigation use, it can create a vacuum that pulls dirty water back through the drain line.
The dishwasher high loop to garbage disposal setup is particularly vulnerable because disposals often sit lower than the dishwasher’s drain outlet. When you run the disposal with a full sink, water can surge up the drain line. Without a high loop, that surge can push contaminated water directly into the dishwasher.
According to plumbing maintenance guides, backflow prevention is a cornerstone of safe residential plumbing. The high loop is the easiest and most cost-effective way to address it in kitchens. It’s not a high-tech solution, but it works, and that’s what matters when you’re rinsing baby bottles or prepping food.
Building Code Requirements for Dishwasher Drainage
Code requirements for dishwasher drainage vary by jurisdiction, but most areas follow the International Plumbing Code (IPC) or Uniform Plumbing Code (UPC). Both codes address backflow prevention for dishwashers, though they use slightly different language.
Under the UPC, dishwashers must either have an air gap or be connected to a drain line with a high loop. The air gap is the gold standard, it provides a physical break in the drain line, but it’s more expensive and requires a visible fixture on the countertop, which many homeowners find unattractive.
The IPC is a bit more flexible. It allows for a high loop as long as the hose reaches a point that’s higher than the flood level rim of the sink or disposal. That usually means securing the hose as high as possible under the counter.
Some local codes are stricter. For example, California’s plumbing code historically required air gaps in all new installations, though enforcement varies by county. Other states accept a high loop as compliant as long as it’s clearly visible during inspection.
If you’re installing a dishwasher yourself, check with your local building department before starting. Inspectors will fail an installation that doesn’t meet code, and fixing it after the fact often means pulling the dishwasher back out, which is a hassle nobody wants.
One more thing: if your dishwasher drains into a garbage disposal, make sure you’ve knocked out the disposal’s dishwasher inlet plug. That’s a common rookie mistake that causes water to back up into the dishwasher, and no amount of high looping will fix it.
How to Install a Dishwasher High Loop
Installing a high loop is straightforward, even for first-time DIYers. It doesn’t require any plumbing experience beyond basic hand-tool use, and most installations take less than 15 minutes. The key is making sure the hose is secured at the correct height and that there are no kinks or sags that could trap water.
Before you start, turn off power to the dishwasher at the breaker and shut off the water supply under the sink. You don’t need to disconnect anything, just make sure the unit is safe to work around.
Tools and Materials You’ll Need
- Drill/driver (cordless is easiest in tight spaces)
- 1-inch screws or a dishwasher bracket kit
- Zip ties or hose clamps (as a secondary option)
- Tape measure
- Flashlight (under-sink visibility is always terrible)
- Safety glasses (especially if drilling into particle board or MDF)
You’ll also need the dishwasher drain hose itself, which typically comes with the appliance. If you’re replacing an old hose, buy a new one, they’re cheap, and old hoses can develop cracks or buildup that lead to leaks.
Step-by-Step Installation Process
1. Locate the highest point under the counter.
The hose should rise as close to the underside of the countertop as possible without touching it. Measure about 20 to 30 inches from the floor, or just leave about 1 inch of clearance below the counter surface.
2. Attach a mounting bracket or screw.
Most dishwasher installation kits include a small plastic or metal bracket designed to hold the hose in place. Drill a pilot hole into the cabinet side wall or underside of the counter, then secure the bracket with a screw. If you don’t have a bracket, a single screw with a large washer works fine, just loop the hose over it.
3. Route the drain hose up and over the bracket.
Pull the hose from the dishwasher outlet, loop it up to the bracket, and then let it descend toward the disposal or drain line. Make sure there are no kinks or sharp bends. The hose should form a smooth arc.
4. Secure the hose at the high point.
Use a zip tie or hose clamp to fasten the hose to the bracket. It should be snug but not so tight that it pinches the hose and restricts flow.
5. Connect the hose to the disposal or drain.
If draining to a garbage disposal, slide the hose onto the disposal’s dishwasher inlet and secure it with a hose clamp. If draining to a tailpiece or standpipe, use the appropriate adapter fitting. According to appliance installation tips, making sure connections are tight prevents leaks and keeps your cabinet dry.
6. Test for leaks.
Turn the water and power back on, then run a short rinse cycle. Check the high loop, the connections, and the area under the sink for any dripping. If everything’s dry, you’re good to go.
If you’re also installing a garbage disposal, the same high loop principle applies. Just make sure the dishwasher hose connects to the disposal’s inlet above the trap, and don’t forget to knock out that plug. Many home maintenance resources emphasize double-checking that knockout, it’s the most common installation mistake.
One last tip: if your local code requires an air gap instead of a high loop, you’ll need to drill a hole in the sink or countertop and install the air gap fixture. That’s a bit more involved, but it’s still a DIY-friendly project if you’ve got a hole saw and a steady hand.